
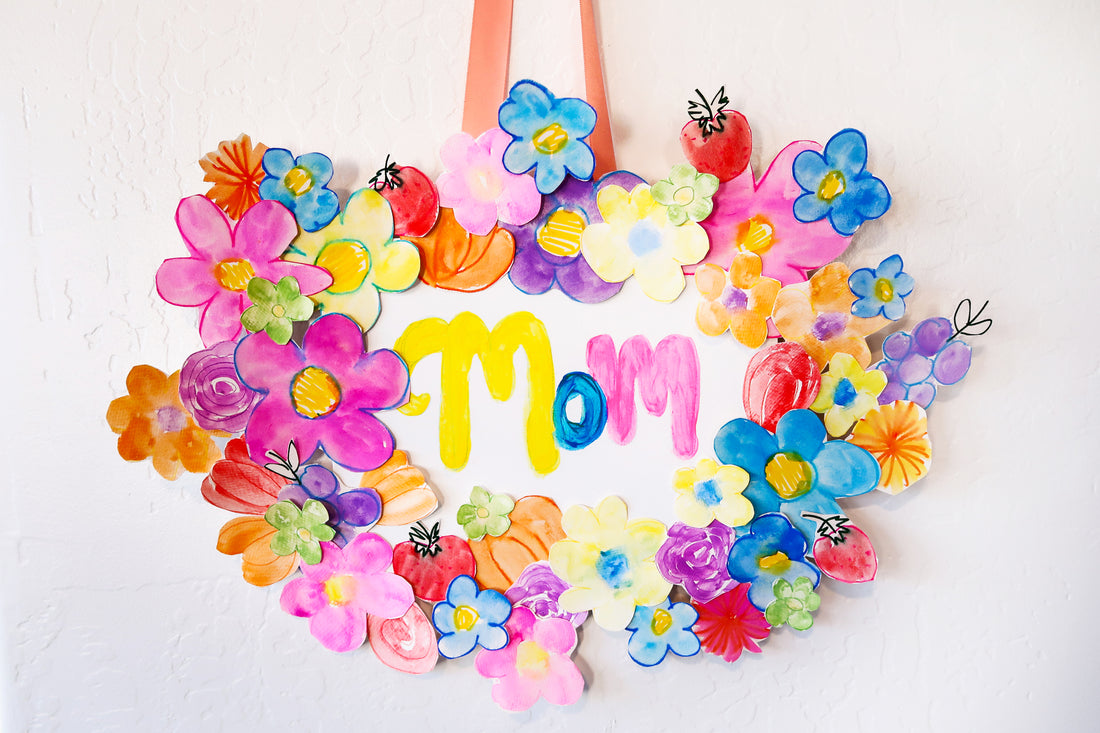
Mother’s Day Floral Wall Art DIY
Mother’s Day is a day to celebrate someone who cares for you in the best way. This is the perfect project to show that special person that you appreciate them.
In this tutorial I will walk you through painting a flower wreath made using the Kid Made Modern Studio in a Box . It only requires the kit and a couple other supplies.
Supplies:
- Studio in a Box
- Paper Towel
- Paper Plate
- Scissors
- Ribbon ( for hanging)
- Glue dots or Glue Stick

Step 1
Grab the 8x10” canvas board from the kit. Then grab the colored pencils. Choose a pencil to use to outline the word “Mom” in the middle of the canvas board. I chose to use one colored pencil but you can choose to use up to three different colored pencil colors to outline the word.

Step 2
Next, you want to create a palette for your acrylic paint. Since there is no official palette in the kit you have a few options. You can use a piece of the watercolor paper, on top of the box to stabilize it, and squirt the acrylic paint on it. Your other option is a paper plate or a palette you already have at home. I chose to use the colors: blue, pink and yellow for this project. Feel free to use whatever colors you think your mom will like best!

Step 3
Once you have your paint on your palette start filling in the word “Mom” on your canvas board using one of the paint brushes from the kit. I started with yellow, then blue and the final letter I painted pink.

Step 4
Wait until the paint dries and apply another layer of color to make the colors more bold and less transparent.

Step 5
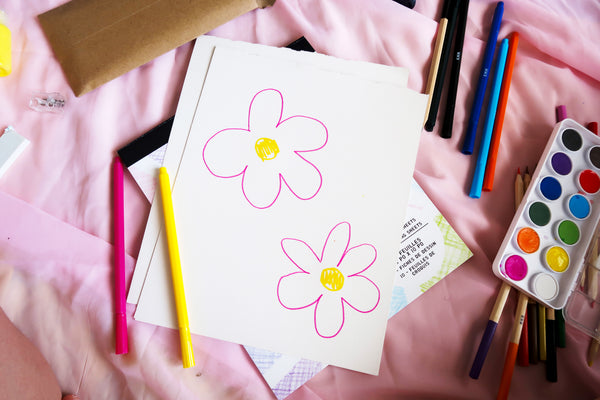
While the canvas dries, move on to your next step. Grab 3-4 sheets of both watercolor paper and mixed media paper that came in the kit.

Step 6
Grab the watercolor paper first and use a mix of colored pencil colors to create outlines of flowers. Use the colors you like best. I used yellow, red and pink. Create different sized flowers to have a variety.

Step 7
Now you want to fill in the flowers, so grab your watercolor palette and one of the paint brushes from the kit. Make sure to wet your brush and then move it along the surface of the watercolor paint to get it nice and wet. Go back and forth between the water and paint until you have a good amount of color on your brush. Create the middle of the flower first with yellow paint and then add in the pink for the petals.

Step 8
Continue to paint the flowers with watercolor until you have 3-4 sheets of flowers painted. Then put them off to the side to dry.

Step 9
Now grab your mixed media paper and you are going to do the same thing like you did with the watercolor paper but instead of using colored pencils to outline the flowers, use the markers from the kit. Also use the marker to create the yellow center of the flowers.
Step 10
When you are done creating the outlines you should have a variety of flowers and if you want you can add some fruits. I made strawberries and grapes.

Step 11
Using your watercolor palette fill in all the flowers and fruits. Do not worry about staying inside of the lines.


Step 12
Make sure your flowers are all dry before moving on to this next step. You will also be using scissors so adult supervision is needed. Using your scissors carefully cut out the flowers. Use the outline as a guide. This step will take some time so maybe ask for some help!

Step 13
Once the flowers and fruits are all cut out you should have a pile of all types of beautiful flowers for your wreath!

Step 14
Next you want to attach the flowers to the “Mom” canvas board. To do this you can use glue dots (like shown) or a glue stick. If you do use a glue stick make sure to not lift up your board until everything is dry.

Step 15
Using a glue dot, place one on the back of each flower and stick it to the canvas board. Create your first layer of flowers around the board. Feel free to overlap flowers, like shown in the sample. I put some bigger flowers in the corners to start creating the wreath.

Step 16
Continue adding flowers big and small around the board using the glue dots.

Step 17
Once you have your first layer complete you should not be able to see any of the canvas edges.

Step 18
Use the remaining flowers to add another layer to the wreath.

Step 19
Once you have finished it should look something like this! You don’t have to use all of the flowers. I had some remaining at the end that I did not use.

Step 20
Take a closer look at it!

Step 21
If you want to hang it you can apply some glue dots to a piece of thick ribbon and stick it to the back of the canvas board.

Your Mother’s Day Floral Art is complete!

About the Author:
 Rachel is the artist and founder of Pink Puddle Studio LLC. Her mural work has been televised on CNBC’s Cash Pad. Her work has been featured in HGTV Magazine, Phoenix New Times, Phoenix Home & Garden, Arizona Highways Magazine and College Times.
Connect with Rachel on instagram @pinkpuddlestudio and www.pinkpuddlestudio.com